I have a 14 month old baby girl who just started in the amazing Gan where her older sister has been going for the last 2 years. My husband walks into my sewing room and says so by-the-by: "You need to make a Gan bag!" Aehm, I have major sewing ADHD! You cannot just walk in here, while I have about 68 other projects planned in the next 2 months and tell me to make a Gan bag...
Okay, you can and here we go. After a quick search on Pinterest, I decide I don't like any backpacks there. I start throwing some ideas around, but its no fun by myself so I consult with my mom quickly and we decide to start with an oval bottom and go from there.
You need:
- About 0.5 meter of quilting weight cotton (I made two from 1 meter) - I used Riley Blake Sunny Happy Skies Yellow Main which goes on the outside
- About 0.5 meter Home-Decor weight Fabric (I got dark pink Minna from IKEA) which goes on the inside. Its not really a lining, but gives it stability.
- Coordinating Thread
- Thick double-side interfacing
- One-sided thin interfacing
- Small, long scrap of batting
- Some twill tape or ribbon, small elastic band
- Free Pattern
- Sewing machine & Standard Sewing Supplies
General Guidelines:
- If you are using a directional print always make sure your fabric is facing the right direction.
- 1/4" Seam Allowance unless otherwise indicated.
- Pin before sewing. I use flower head needles and pin not along the seam but in a 90 degree angle to it. Remove pins as you go.
- Always check your stitches on the top and bottom. If its bad, change the needle and / or adjust thread tension according to your sewing machine's manual.
- Iron before you sew. It makes a better quality product for sure.
- Always back-stitch at the beginning and end of your stitch to secure your thread.
1) Cut out all pieces according to the pattern.
You should end up with:

- 3 main body piece (1 main, 1 "lining", 1 thick interfacing)
- 3 oval bottom body piece (1 main, 1 "lining", 1 thick interfacing)
- 3 top cover piece (1 main, 1 "lining", 1 thin interfacing)
- 1 bottle pocket
- 1 front pocket
- 2 large strips for shoulder straps and 1 small one in main fabric and coordinating batting
- 1 long piece for casing on the top

2) Iron your pieces.

- Iron the fabric of the boby part on the thick interfacing with high heat, and repeat with the oval bottom part.
- Iron the thin interfacing on the wrong side of the main fabric of the lid part.
- Iron the 3 straps in sort of a bias tape form so that the batting is completely covered and no raw edge is showing
- Fold and iron 0.5cm on each of the short ends towards to inside (to prepare a seam) of the casing piece and fold in half aligning the long sides. Iron.
- Iron the pockets so the fabric is without wrinkles.
3) Now that you have prepared all pieces, its time to start sewing. I started by doing all small parts first.
Front Pocket: With the fabric facing right on right, sew from one bottom corner up, across and down. Clip the corners and turn inside out. Iron. Turn the bottom raw edges inside to create a finished seam. Iron. Pin and sew it on the main body piece by aligning the middle of both pieces. I folded the main piece in half (aligning the short sides) and folded the pocket piece so it was easier to find the middle of both. The bottom seam of the pocket should be about 1inch away from the raw edge of the body piece. Sew on pocket.
Casing: Seam the casings short ends on both sides. Fold in half and sew on the main body piece on the top - all raw edges are facing up. We will later fold the casing up and put a twill tape or elastic inside.

Shoulder Straps and Handle: Place batting (I used thin natural cotton) inside and fold fabric over so no raw edge is showing. Quilt with about 0.5cm distance between each line starting on the fabric folded in the middle to secure it. Repeat for other strap and handle. Trim all threads and ends.
Bottle Pocket: With fabric facing left on left (the fold of the fabric is still the top), sew across about 2 cm from the top. Take a 10cm thin elastic band and thread it with a safety pin through the casing you just made. Zig Zag stitch the elastic end on one side secure and serger with a tight stitch along the raw edge to finish it. Fold and iron about 0.5cm under the fabric to make a seam.
Now, the tricky part. Place the pocket on the main body piece on the desired side. The finished edge you just created should be about 2cm from the front pocket. The Pocket should "hang over" the raw bottom edge of the main body piece by about 2 cm (see picture).
 Sew down the seam you just created to secure one side of the pocket. Then you pin in place the second side of the pocket. Its a good idea to put a bottle inside to make sure it will fit later. Adjust the elastic band to the right tightness and sew down to secure the second side. While the bottle is inside take the middle point of the raw edge of the pocket and align with the raw edge of the main body piece. Pin in place. Then fold the rest of the pocket piece as shown to create space for the bottle later to stand. Sew across to bottom to secure to pocket. Trim excess fabric and threads.
Top Flap: Place the right side of the main fabric on the right side of the "lining" fabric. Sew around from Point A to B as shown in the pattern. Use pinking shears to trim off some bulk. Turn inside out, iron and top stitch along the line. Stitch across to other end and serger the raw edge.

4) Assembly of the back pack
Yeah, almost done! Place the bottom piece right on right on the middle of the main body piece aligning the raw edges. Pin in 90 degree angle about a quarter of the bottom (from the half point of the straight line to the half point of the oval). Back stitch and then sew along slowly to about the half point - finish with a back stitch.
When you get to the back part of the back pack just after the curve, dont forget to slip in your quilted straps and secure them tightly. You can even back stitch over the length of the straps to make it more secure.
Check your seam bottom and top and correct if you need to. If everything is good, start pinning from where you just finished to the mid point again. Stop about 1 cm to the end of the main body piece (the back of the back pack that you will sew together later).
Repeat the same for the other side. Be sure to go slow, pin correctly and check your seams. Turn inside out to check the seams there.
Now that you have finished the bottom, align the raw edges of the main body piece, pin and stitch all the way down. Go around the oval and the seam you just created with tight zig zag to finish it as nice as you can since this bag does not have a lining.
5) Attach straps, handle and flap:
Place the straps and the handle on the top edge where the casing meets the main body piece (the handle is pinned here wrong, please place it like the straps). Place the flap right on right on top of the straps and handle aligning with the edge of the casing (lining fabric is facing up, the backpack is basically opened). Sew across. Fold the flap over so you see the back of the backpack and the top of the flap. Top stitch over the flap to conceal the ends of the straps and handle. Sew Velcro of the bottom of the flap and on the front of the back pack over the front pocket with a X-stitch.
You are finished!!!
Please use this tutorial only for private use, if you want to sell products made from this pattern, you will have to buy a limited license. You can email me at info@sewadorable.co.il.
Now, I would love to hear your feedback and drop me a line when you made one.
All the best, Hannah from Sew Adorable
Labels: back pack, cotton, pattern, riley blake, tutorial


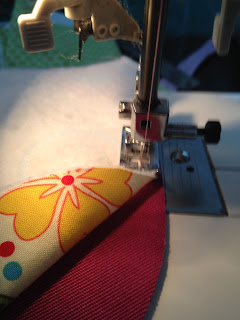
 Align right on right the short end of the solid piece with the long end of the print piece and pin. Stitch along the raw edge with a 1/4" seam allowance, the finish the raw edge with zigzag and trim all threads. Iron the seam towards the print piece and top stitch.
  Seam the sides and the top using the same technique.
  Cut out your pieces and iron them. If you can arrange to cut your Pink Friends fabric from the printed selvage, you could leave that on and use that as the seam for the inside piece.


